Hey guys. It has been quite awhile. I haven't really been workin on gunpla in the past two months or so. Basically I'm looking for a job right now and can't really justify spending time on gunpla. Money is really tight so I'm putting all of my time and energy into landing job so I can pay off my student loans and have enough money to live. Hopefully I'll get something here soon. Anyway, that's whats up. Happy gunpla guys and thanks for the complements and support.
-Dill-n

Saturday, March 5, 2011
Sunday, January 23, 2011
Just an Update...
For those you you who check my blog and see me on MAC, you may have noticed my absence for the past couple of weeks. I just wanted to show you that I haven't vanished, I'm still here. There are just a few other things going on right now that are more of a priority and I can't afford to spend all my time and money on Gunpla, as mush as I'd like to haha. Anyway, I'll keep you updated and hopefully I'll find sometime to work my kits here shortly.
Friday, January 14, 2011
Resin Haul...
So today I got a package, if you read the title of this post, you may have an idea of what that may be. So here it is. Lets open it up...


So, I got some new tupperware.... Okay, its actually E2046's AGX-04 Gerbera Tetra. I ordered this around Christmas because I've been really inspired to try out a resin kit lately. Since this one was pretty affordable I took the leap and bought it. Again, since this is a brand new process to me I also chose a kit that I liked but wouldn't mind screwing up should I suck at build resins. Anyway, lets take a look inside.
It came with this photo of the finished kit, which is great reference. Although I got to say I won't be painting this that odd pink, maybe red but we'll see. Sorry the image is a bit blurry, I added and more detailed photo of the upper body to help you get the idea.


First page of the instructions is a check list of all the pieces. I read on Matt Tomczek's blog that he checks all the pieces before starting and figured it would be a good habit to get into. I did go through and saw that every piece was accounted for and I'd recommend doing so if you intend to get into this sort of thing.

Next page is the actual instructions. At first I thought there'd be more but I realized the put instructions for one arm and one leg. Makes sense, if I build one I should be able to build the second. Definitely different from your standard Bandai snap fit instructions. Hope I can pull this off.


Last page is a photo of all the pieces lined up. I ended up using this to help check all the pieces.

And finally the resin pieces of course. They're fairly detailed and I didn't see any major problems with any of them. So hopefully this build will go smoothly.


I think this will really look nice once it's together and painted. Unfortunately, this is at the tail end of my to-do-list. I don't think I'll get started with this until late in the year. As soon as I get some progress to show I'll be sure to share. Until then....
Thanks for reading!


So, I got some new tupperware.... Okay, its actually E2046's AGX-04 Gerbera Tetra. I ordered this around Christmas because I've been really inspired to try out a resin kit lately. Since this one was pretty affordable I took the leap and bought it. Again, since this is a brand new process to me I also chose a kit that I liked but wouldn't mind screwing up should I suck at build resins. Anyway, lets take a look inside.
It came with this photo of the finished kit, which is great reference. Although I got to say I won't be painting this that odd pink, maybe red but we'll see. Sorry the image is a bit blurry, I added and more detailed photo of the upper body to help you get the idea.


First page of the instructions is a check list of all the pieces. I read on Matt Tomczek's blog that he checks all the pieces before starting and figured it would be a good habit to get into. I did go through and saw that every piece was accounted for and I'd recommend doing so if you intend to get into this sort of thing.

Next page is the actual instructions. At first I thought there'd be more but I realized the put instructions for one arm and one leg. Makes sense, if I build one I should be able to build the second. Definitely different from your standard Bandai snap fit instructions. Hope I can pull this off.

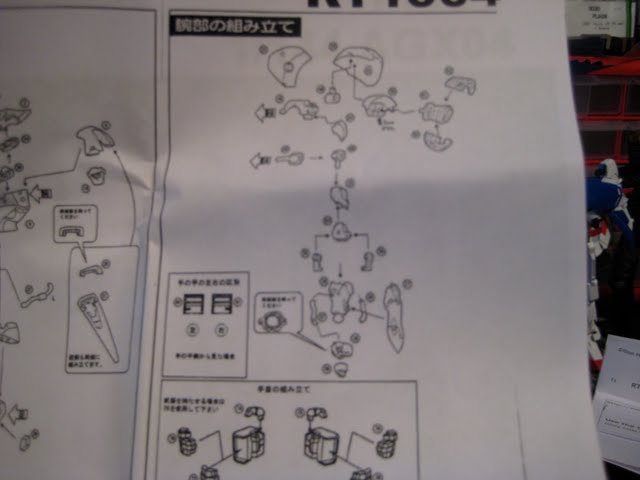
Last page is a photo of all the pieces lined up. I ended up using this to help check all the pieces.

And finally the resin pieces of course. They're fairly detailed and I didn't see any major problems with any of them. So hopefully this build will go smoothly.


I think this will really look nice once it's together and painted. Unfortunately, this is at the tail end of my to-do-list. I don't think I'll get started with this until late in the year. As soon as I get some progress to show I'll be sure to share. Until then....
Thanks for reading!
Monday, January 10, 2011
1/144 Ex-S Gundam

By far, my favorite Gundams are those from the sentinel series. I don't know much about the series but I love the mobile suit designs. So having my first S Gundam is kind of a big deal to me. I got to say this is one of my favorite models. For a 1/144 scale this thing is so detailed and has a lot more gimmicks then some of the MGs I have. Unfortunately, even though this thing is soooo cool it turned out to be a big disappointment in some areas. As I was building this thing I was loving it. Until I got to the backpack. The back pack itself is pretty cool, other than the wobbly thrusters, but it makes this thing sooooooooooo unbalanced. Which normally wouldn't bother me. I would just use an action base and give it an aerial pose. Not in this case. Unfortunately, it doesn't have any sort of hole or area for an action base to go as far as I know. This model also has some of the worst articulation of any model I have. The head turns 15 degrees tops and doesn't nod. The Torso has no articulation, it doesn't turn or lean. And the armor on the legs restricts it's motion to maybe 15 degrees as well. Without the armor though the legs are fine and the arms and shoulders have a a good range of motion.
Having said all that, I still like the model and was plesently surprised to find out that this kit comes with all the pieces to make it the regular S Gundam ( that may have been known to some of you but not me ). The armor on the legs comes off, as shown below, and the chest and crotch pieces can be changed out too. More than likely, I will just display this as the S Gundam or maybe the Ex without the backpack. In fact because I wasn't too thrilled with the back pack i might just use the back pack on the Zeong Bear.... hmmm
Here are some photos of the straight build. Because I really, really like this kit I'm not going to be modifying it or doing an elaborate paint job. probably some touch up paint and maybe a top coat.


Snow Day
Today I awoke to quite a bit of snow piled up in the yard. I don't know where a lot of you guys live, but here 4-8 inches of snow is A LOT and very rare. It's too bad I don't have a job right now because I would have got the day off haha. Anyway, my brother and I took a walk around our small town this morning and I thought I show you a few pictures.


Saturday, January 8, 2011
G-System's The O
I was checking out a few sites today and found out that G-System has the design of their "The O" (with updated internal frame) resin kit finished. It looks really awesome if I say so myself. I did some quick math too so if this is a 1/72 scale model that would make the kit just shy of 4ocm tall! I hope some day I'm able to pick one of these up considering it has an equally large price tag. Anyway the image is below, check out G-Systems site for price and more details.


Friday, January 7, 2011
Zeong Bear Chapter 3
PREVIOUS CHAPTER
So I've been working on little things here and there on the Zbear while also working on the thrusters and backpack stuff. I got a few things accomplished thought I'd share the progress. For one I finally close the gap on the tail of the skirts that cracked away. I originally had it fixed and filled the underside with putty but I think I might have the wrong kind of putty cause it sort of ate through the pla. Almost like it melted. Its worked fine on other things befroe but I think the large amount of putty I used to fill in the space is to blame. Also just keep in mind a lot of this stuff still needs some clean up.

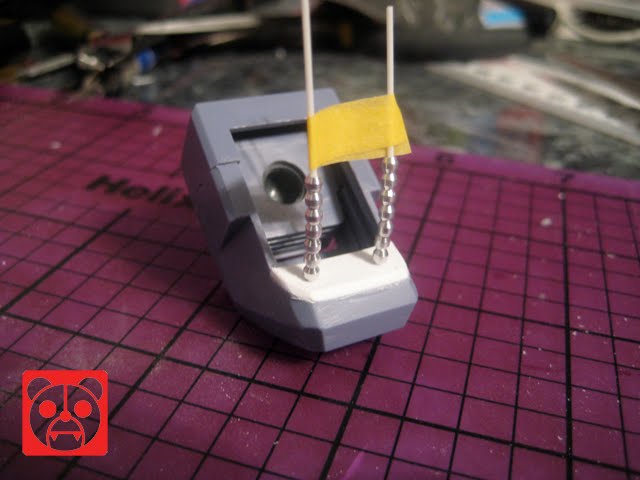
I also came up with a, what I think is cool, detail under the collar piece. After I cut away this sort of serrated lip thing, I put some pla across the gap and punched some holes for some pla tube. Then I put some metal beads on the tubes and now there's a neat piping feature under the collar. NOTE: I added some more pla and some other stuff to this later but I don't have any pics of it. And these pictures aren't in order of date that's why there is a random piece of pla in between the pipes.


Saved the best for last. I finally got around to attaching the ball socket poly cap to the torso. And after seeing how the struts looked that hold up the piece from the 00 Raiser's ankle, I decided to add some pla to cover them up. I haven't glued the struts on yet, I still a bit of cleaning and testing to do before this thing will be securely attached. At least you'll be able to see how the torso can articulate now. I'll still have a lot of detailing to do to fill in the space around the waist. You might even see some pistons used, we'll see.
Now the torso can lean backwards, like before, but also forwards a bit. It can lean side to side, so much so that it was tipping over, haha. The final product probably won't lean that far. What I'm most happy about, is that it can now rotate. Hopefully once I detail this up it will retain all these motions with restriction.


--------------------------------------
So I've been working on little things here and there on the Zbear while also working on the thrusters and backpack stuff. I got a few things accomplished thought I'd share the progress. For one I finally close the gap on the tail of the skirts that cracked away. I originally had it fixed and filled the underside with putty but I think I might have the wrong kind of putty cause it sort of ate through the pla. Almost like it melted. Its worked fine on other things befroe but I think the large amount of putty I used to fill in the space is to blame. Also just keep in mind a lot of this stuff still needs some clean up.

I also came up with a, what I think is cool, detail under the collar piece. After I cut away this sort of serrated lip thing, I put some pla across the gap and punched some holes for some pla tube. Then I put some metal beads on the tubes and now there's a neat piping feature under the collar. NOTE: I added some more pla and some other stuff to this later but I don't have any pics of it. And these pictures aren't in order of date that's why there is a random piece of pla in between the pipes.


Saved the best for last. I finally got around to attaching the ball socket poly cap to the torso. And after seeing how the struts looked that hold up the piece from the 00 Raiser's ankle, I decided to add some pla to cover them up. I haven't glued the struts on yet, I still a bit of cleaning and testing to do before this thing will be securely attached. At least you'll be able to see how the torso can articulate now. I'll still have a lot of detailing to do to fill in the space around the waist. You might even see some pistons used, we'll see.
Now the torso can lean backwards, like before, but also forwards a bit. It can lean side to side, so much so that it was tipping over, haha. The final product probably won't lean that far. What I'm most happy about, is that it can now rotate. Hopefully once I detail this up it will retain all these motions with restriction.


Thanks for reading!
--------------------------------------
Subscribe to:
Posts (Atom)
